

In today’s internet and social media-driven world, one of the most powerful tools for a growing brand is a YouTube channel. A well-optimized channel with high-quality videos can expand your network, build an audience, and establish you as an expert in your field. If you’re wondering how to create a new YouTube channel, you’re in the right place!
Creating and growing a successful YouTube channel involves more than just uploading videos. Effective management includes strategically scheduling content to ensure a steady stream of engaging videos. Good YouTube channel branding encompasses much more.
In this blog, we’ll start with the basics of creating and scheduling YouTube video content for your channel. Then, we’ll explore the best ways to optimize your content and grow your audience!
How to Create a YouTube Channel in 3 Simple Steps!
1. Create a YouTube Account
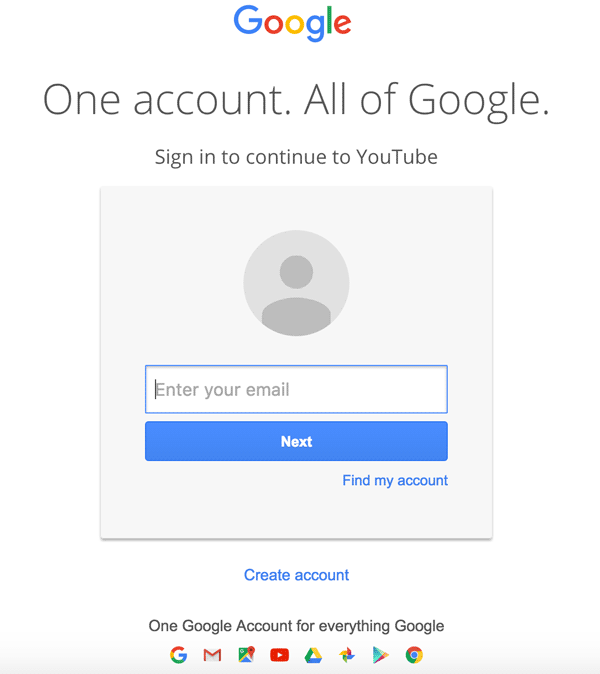
Creating a YouTube account is simple, especially if you already have a Google account. For a personal YouTube account, your Google account will suffice. However, if you’re setting up a YouTube channel for business, you’ll need to create a brand account.
Steps to Create a YouTube Brand Account:
- Go to YouTube: Navigate to the YouTube account page.
- Create a Channel: Click on “Create a Channel.”
- Enter Brand Name: Input your brand name, and you’re set!
Once your channel is created, you can customize the name and appearance to suit your brand. Share admin access with team members to collaborate on new projects.
One of the key benefits of a brand account is access to YouTube Analytics, providing valuable insights about your audience and trending videos. Additionally, you get a separate Google account managed under your main account, making it easier for your brand to engage with commenters. To gain extra credibility, learn how to get verified on YouTube.
2. Customize Your YouTube Channel
Now that you’ve created a YouTube channel, it’s time to customize it. From your dashboard, select the “Customize Channel” option. You’ll find three tabs: Layout, Branding, and Basic Info.
Basic Info
- Enter Information and Keywords: Add relevant information and keywords to help your target audience find you. Include industry-specific terms and channel topics.
- Profile Picture: Upload a professional and unique profile picture.
- Channel Description: Write a compelling channel description and add links to your website and other social media channels.
Branding
- Channel Art and Icons: Upload distinctive channel art and icons that align with your brand’s visual identity on social media platforms.
Layout
- Organize Your Content: Once you start uploading videos, use this section to organize your featured video, playlists, and more.
Customizing your channel effectively will enhance its professional appearance and make it easier for your audience to connect with your content.
3. Upload Your First YouTube Video
Your YouTube channel is almost ready! It’s time to upload your first video.
Steps to Upload:
- Click the Create Button: Located at the top right corner of the screen.
- Upload Your File: Select and upload your video file.
Optimize Your Video:
- Title: Add a strong, concise, and Google-friendly title. Ensure it’s relevant to your content and intriguing for viewers.
- Description: Use this space to include keywords and links to other videos or websites. This helps with SEO and directs viewers to more of your content.
- Sections and Timestamps: For lengthy videos, divide them into sections with timestamps to create a table of contents. This makes it easier for viewers to navigate your video.
- Tags: Use relevant tags in moderation. Tags help the YouTube algorithm understand your content and push it to the right audience.
By optimizing these elements, you can enhance your video’s visibility and make it more appealing to your target audience.
How to Create YouTube Channel Art

Creating eye-catching YouTube channel art is essential for making a great first impression. Here’s a step-by-step guide to help you design professional and appealing channel art:
Step 1: Know the Dimensions
- YouTube Channel Art Size: The recommended size for YouTube channel art is 2560 x 1440 pixels.
- Safe Area: Ensure important elements (text and logos) are within the central 1546 x 423 pixels area, which is visible on all devices.
Step 2: Gather Your Tools
- Design Software: Use tools like Adobe Photoshop, Canva, or GIMP.
- Templates: Many design tools offer free YouTube channel art templates that you can customize.
Step 3: Design Your Channel Art
- Choose a Template: Start with a template that matches your brand’s aesthetic.
- Add Background: Use a high-quality image or color that aligns with your brand. Ensure the background is not too distracting.
- Insert Your Logo: Place your logo within the safe area. Make sure it’s clearly visible.
- Add Text: Include your channel name, tagline, or any other important information. Use readable fonts and keep the text within the safe area.
- Include Social Media Links: You can add icons for your social media profiles.
Step 4: Align with Your Branding
- Consistency: Ensure the colors, fonts, and overall style of your channel art match your brand’s identity.
- Visuals: Use images or graphics that reflect the content you create.
Step 5: Save and Upload
- Save Your Design: Export your design in a high-quality format (JPEG or PNG).
- Upload to YouTube:
- Go to your YouTube channel.
- Click on the Customize Channel button.
- Click on Add Channel Art.
- Upload your saved design.
Step 6: Adjust and Finalize
- Preview: Check how your channel art looks on different devices (desktop, tablet, mobile, TV).
- Adjust if Necessary: Make any adjustments needed to ensure your art looks good on all platforms.
Tips for Great Channel Art
- Simplicity: Keep the design clean and simple.
- Focus on Branding: Ensure your channel art immediately communicates your brand’s identity.
- High Quality: Use high-resolution images to avoid pixelation.
By following these steps, you can create professional YouTube channel art that enhances your brand and attracts viewers.
Top 5 Tips for Optimizing Your YouTube Channel
Creating a YouTube channel is just the beginning; growing it is where the real work starts. Here are five essential tips to help you optimize your channel and attract more viewers:
- Understand Your Audience:
- To create content that resonates, you must know your audience. Use YouTube Analytics to gain insights into viewer behavior and preferences. Identify which videos boost engagement and tailor your future content accordingly.
- Optimize Your Channel Art:
- Just like a billboard needs regular updates, your channel art should be eye-catching and up-to-date. Make sure it clearly communicates your brand’s message and visual identity. Regularly refresh it to keep your channel looking professional and engaging.
- Prioritize YouTube Thumbnails:
- Thumbnails are the first impression of your videos. Use bright colors, clear text, and brand elements to make them stand out. A compelling thumbnail can significantly increase your click-through rate. Consider using an AI YouTube thumbnail generator for added creativity.
- Create Playlists:
- Playlists help you organize your content and encourage viewers to watch more of your videos. Group related videos together to make it easier for viewers to find and binge-watch your content, enhancing their viewing experience.
- Consistency and Scheduling:
- Consistency is key to growing your channel. Create and upload videos regularly. Use a content calendar to schedule your uploads at times when your audience is most active. This helps maintain viewer interest and engagement.
By implementing these tips, you can effectively optimize your YouTube channel, attract more viewers, and build a loyal audience.